How to speed up Windows 10?
A computer starts and shut down within few seconds, programs open quickly and even websites open without delay. A fast operating system is every user’s dream. But the reality is usually very different. A freshly installed Windows 10 feels like lightning fast, but the longer the computer is in use, the more it loses speed. This is not only extremely annoying, but also affects work performance. With the following tips and tricks you can speed up Windows 10 and put your computer back on the fast track.
- The hardware is rarely the real reason for a slow system.
- A direct increase in speed can be achieved with a few simple tips and tricks.
- Temporary files and graphical effects slow down your computer.
Possible causes for a slow PC
If the computer’s performance drops after a while, many users blame the hardware. Processors rarely press the brakes.
The most common cause of a slow PC is a cluttered hard drive. The use of programs creates temporary files that are normally automatically removed when the software is closed, but are often simply “overlooked”. This leads to a large amount of data garbage, which over time fills up the hard drive and slows down the work pace. But a full cache memory, superfluous background services and an overloaded autostart can also make your computer slower and slower.
Accelerate Windows 10 using built in tools
A few simple steps are often enough to speed up Windows 10. The operating system also provides the necessary tools for this in a practical way.
Autostart Cleanup
The installation of programs and apps is almost always accompanied by an entry in Autostart so that they start automatically when Windows 10 is booted. What was intended as a tool by Microsoft can develop into a real brake pad as the number of programs increases.
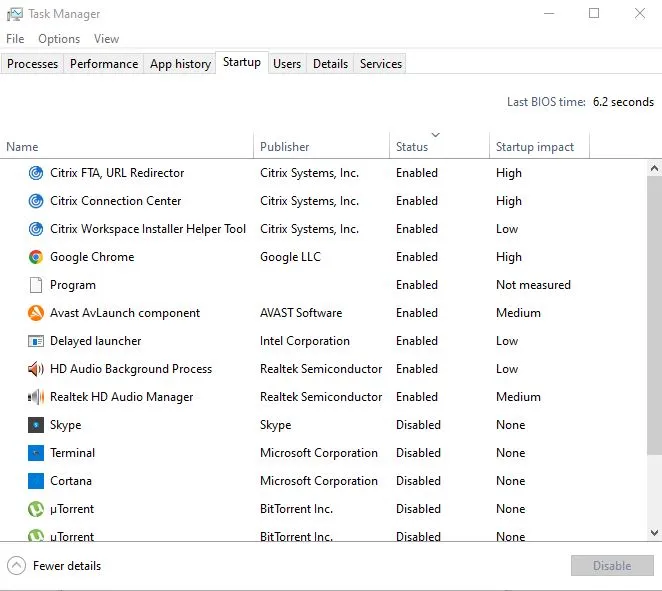
In order to accelerate the system start, it is always worthwhile to take a look at Autostart from time to time and deactivate the programs that are not required there. To do this, you must do the following:
- Right-click on the Windows icon in the taskbar and open the “Taskmanager” (alternatively you can also use “taskmgr” in the search bar).
- Click the More Details arrow to open the full view.
- Go to the “Startup” tab.
- Right-click the programs you don’t want to start automatically and choose Disable.
Clearing the cache memory
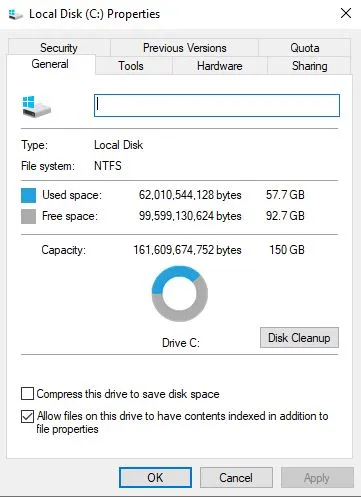
The cache is temporary storage where programs store data so they can retrieve it faster. The list of entries grows larger over time and slows down the work speed, as it takes Windows longer to search for the relevant information. Regularly clearing the cache memory can therefore make a significant contribution to speeding up Windows 10.
The easiest way to do this is to use Disk Cleanup in Windows. To do this, open Windows Explorer and right-click on the hard drive that is to be cleaned up. Then click on “Properties”. With a click on “Clean” you get a list of all files that can be deleted.
Disabling Unnecessary Services
Similar to the autostart programs services in Windows 10 also run invisibly in the background and have a negative impact on performance. Most of these are part of the operating system, but some programs also set up additional services. However, not all of them are usually required. These include, among other things
- The diagnostic policy service
- The print queue (if you are not using a printer)
- The TCP/IP NetBIOS helper service
Caution: It is best to only deactivate a service if you know which program it belongs to and check in advance whether you really do not need it.
The easiest way to stop unnecessary services is via the system configuration:
- Type “msconfig” in the taskbar search window and open System Configuration
- Click the Services tab. Here you will find a list of all services that are started together with Windows.
- Check Hide all Microsoft services to show only software services.
- To deactivate a service, remove the tick in front of it and save the change by clicking on “OK “.
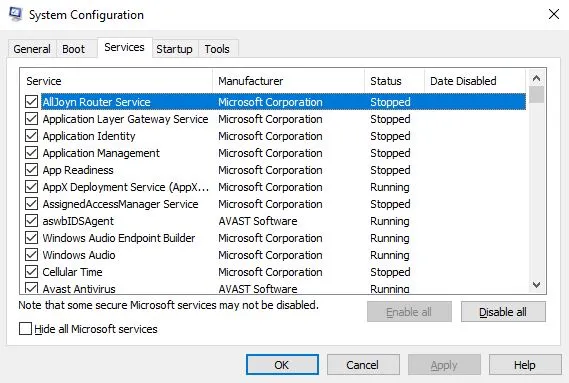
Tip: If there are problems with the associated software as a result of deactivating a service, you can easily reactivate it in the same way.
Disk Defragmentation
Files are not saved in Windows in one piece, but in individual parts, so-called fragments, which are saved one after the other. If a file is deleted, this creates a gap that is closed again the next time you save it.
However, if the new file is larger than the previously deleted one, the excess parts must be added at the end. The more often this process is repeated, the more the file components are distributed over the entire hard disk, which means that searching together takes more and more time.
Therefore, in order to speed up Windows 10, the drives need to be defragmented from time to time. The operating system has its own tool for this, with the help of which you can clean up your hard disk and thus gain more working speed.
To start, click on the drive you want to clean in Explorer and select the Tools tab. There you will then find the “Optimize and defragment drive” function.
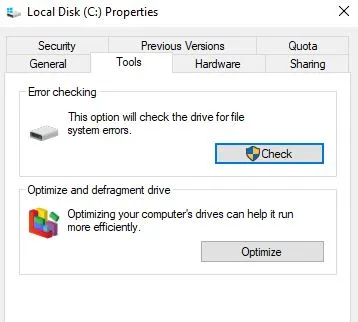
Good to know: Defragmentation only has an effect on classic HDDs, it’s not worth it on an SSD.
Reduce Visual Effects
Admittedly, Windows 10 lives to a large extent through its appealing looks. In contrast to its predecessors, the operating system scores with graphic effects such as shading and animations. Although these look chic and make work more enjoyable, they are not absolutely necessary and also use up computing power unnecessarily.
In the “Advanced system settings” of your computer you will find the item “Visual effects, processor scheduling, memory usage and virtual memory”. In the “Visual effects” tab, you can make specific settings, such as hiding window shadows or deactivating the display of quick menus.
Select the “Automatically select optimal settings” radio button to disable the most performance-intensive effects. The Adjust for best performance option allows you to turn off all visual effects at once to get the most speed.
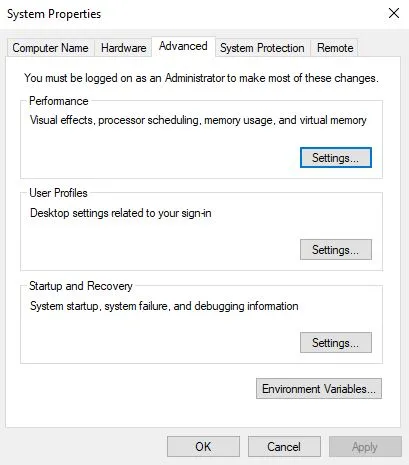
Tip: Turning on hardware acceleration allows you to redirect compute-intensive tasks to the graphics processing unit (GPU).
Useful 3rd Party Tools
Many performance problems can be corrected with the on-board Windows tools, but occasionally the use of a third-party tuning tool does no harm. Here are some popular Windows 10 pick-me-ups that you can use to optimize and speed up your machine:
Ashampoo WinOptimizer
Ashampoo WinOptimizer is the jack of all trades among the cleaner tools. The software not only deletes data waste and defragments your Windows 10 hard disk and registry, but also helps to speed up the system start. With the help of the tweaking function, you can adjust your Windows according to your needs, and the software also has a practical hardware analysis tool.
CCleaner
The CCleaner is one of the most popular programs for system cleaning. The software removes old and useless files, mucks out the autostart and, if desired, also deletes the contents of entire hard drives. Important system files are not touched.
Wise Registry Cleaner
The Wise Registry Cleaner scans your registry database for leftover entries and cleans and defragments them. If desired, the tool also makes settings that optimize Windows 10 and make the system faster and more stable overall.
Suggested Reading:
- Windows Vs Linux which OS is best for you?
- How to change or configure DNS in Windows?
- Wi-Fi 7 The Future of Wireless Connectivity
- How To Use Public DNS IP’s | Best Free DNS Servers
- Beware of Social Engineering Attack
- Complete Solid State Drive (SSD) Guide
- 10 Command Prompt Hacking Tips
- SSL/TLS Vulnerability Fix for Nessus Scanner
- Different Types of Processor Socket in Motherboard
- What is DDoS attack and How it works?

